Android 7 Nougat and certificate authorities
In this article I will cover some details about the way Android 7 "Nougat" treats user-installed certificate authorities. Android 7 improved security in many ways. However, this has several downsides... As an added bonus, I describe a way to install a certificate authority in Android 7 using root access.

Edit: this article was written before Android 7 was released. After release it turned out that Google wasn't going to be as strict as one might think. Click here to read more.
Certificate autorities
So I run my own root certificate authority. This is useful for debugging/reverse engineering apps and websites made by others, but it's also very useful for securing intranet websites without requiring a certificate from an external certificate authority such as Let's Encrypt. It also allows me to sign my binaries so I can run my custom Powershell scripts without lowering the security settings.
Making a device trust a certificate authority is relatively simple: just import the root authority certificate and the device will store the certificate in the centralized certificate store. An exception to this is Android, which has two stored: one for system certificates (which come with Android itself) and user authorities (which the user has installed themselves).
Android is rather paranoid about SSL certificates, so installing a certificate the official way is made as user-unfriendly as possible. Installing a certificate makes the Android OS display a warning about the network being monitored every 15 minutes, and requires the user to set a password on their lock screen. This is because Android stores the certificates in the credential storage, which is encrypted using a key derived from the lock screen code.
Android 7 made things even worse though...
Changes to Nougat
Android 7 ("Nougat") improves performance and battery life in several ways. It also enhances security greatly by making it easier for apps to pin SSL certificates or force all traffic to be transferred over a secure connection. This makes it harder for malicious parties to intercept private data from apps and services.
One of the more controversial changes made to the security framework is the new way user certificate authorities are used.
The good old days
In the good old days of Android 1 to Android 6.0.1 apps didn't have a way to specify whether or not they want to check the validity of an SSL connection using the client certificate authorities. Manually checking the certificate was possible it's not a trivial thing to do so most apps don't do that. By default, all apps trust the user certificate store as much as they trust the system certificate store.
The good (?) new days
Android 7 changed the way this works. By default, apps only use the system certificate store. To use the user certificate store, apps need to specify this in their Network Security Configuration. This configuration isn't added to new projects by default and most developers don't care about their network security (even though they really should!).
This change means that installing a certificate authority is rather pointless: even though the certificate is installed, very few apps actually trust the certificate. The default browser, Google Chrome, doesn't even trust user certificates!
Why this matters: corporate use of certificate authorities
"So you can't use your hacky cheap way to secure a few unimportant intranet services, so what?", you ask. The problem is that I'm not the only one using custom certificate authorities: many companies do it as well.
Many companies use a (transparant) proxy to secure their network and disallow employees to access websites, such as Facebook, Twitter, Youtube, and other distracting sites. This is usually done by intercepting HTTPS-traffic and passing it through a proxy with a set of predefines rules or wordlists. If the website has been blocked by management (or an angry IT-department), the user will get a web page stating "Access denied" instead of pictures of their cats.
These proxies will sign the HTTPS connections that were passing through with a company-wide certificate authority. This autority is usually preinstalled on the office computers and can be installed on employee devices if need be.
For many companies, the only way to access the internet from the LAN is by passing through the proxy. This means Android 7 devices no longer can access any websites through these proxies.
One could say this allows the user to choose whether or not to trust the web filter their employee set up (you never know who's watching those logs...) but in practise many websites load resources and ads from many domains and subdomains. Even if you accept the invalid certificate for the main page, you might not be able to accept the certificate for the hidden domain serving CSS and Javascript. This breaks most websites loaded through a corporate proxy!
Why this matters: business use of certificate authorities
Web filtering
I work at a small ISP which specialises in filtering the web. Customers get a customizable web filter, blocking out things like porn. The customers want this web filter and pay extra to get it. It used to be an easy task: just proxy all traffic passing through port 80 and show a block page whenever certain words appear in the HTML.
This changed over the years though. Google, Youtube, Facebook and Twitter all force the use of HTTPS these days. The default policy for HTTPS traffic has always been "let it pass through, it's probably someone logging in anyway". However with plain Google searches passing through secure channels, a method to filter HTTPS requests became a necessity.
Web filtering products solve this the same way corporate proxies do: by proxying all requests and signing the connection to the user device using a custom certificate authority. After the user installs the custom certificate authority root certificate on their devices, they can enjoy the web safely.
Apps & Android
Apps are a different story though. Many apps use certificate pinning already, meaning that they refuse to connect through the filtering proxy. This causes apps to not work at all, even though the web filter policies allow the app traffic.
In Android 7 this breaks almost every app. With no way to make apps trust the user-installed certificates, users have no choice but to accept the app failing. So far, when a device did something like this, the general advice to non-technical people was "just use the browser" or "sorry, that doesn't work on your device". However with the many Android devices out there, saying "you can't do that anymore because you updated" becomes impossible.
The bright side: geeks can still do it!
Skilled techies only
If like me you need to install a custom certificate on your Android 7 device, you're going to need root access. If you don't know what that means, I recommend you Google around before reading on.
Root access comes with some devices, but many devices require the user to unlock the bootloader of their device (wiping all user data) or to run an exploit on Android (which is dangerous as the exploit might be a virus). In many cases rooting your device also causes you to lose your warranty because you could overload/overvolt/overclock your device causing hardware damage.
Requirements
To install a certificate root authority you'll need the following files and software:
- The certificate authority root certificate file, encoded as a PEM file
- OpenSSL installed on your computer
- The ADB command line tools (ADB stands for Android Debug Bridge) and the ADB drivers for your Android device installed on your computer
- Root access to your Android device
Step 1: preparing the certificate
To prepare the certificate, open a terminal window or command prompt and navigate to the directory which contains your certificate file.
cd ~/Downloads/
To install the certificate on Android, we need to rename the file to the name Android expects. The file name must be a certain hash of the certificate file with a .0 extension. The hash used for this is the old OpenSSL (<1.0.0) hash. To calculate this hash, execute this code:
openssl x509 -inform PEM -subject_hash_old -in cacertificate.crt | head -1
This wil give you the deprecated certificate hash. For example, the output I got was 69241f1f. This means I must name my certificate file 69241f1f.0 for Android to accept it.
Rename the file to the correct filename and transfer it to your phone. For this guide I will assume the certificate is called 69241f1f.0 and is stored in /sdcard/Downloads.
Step 2: placing the file on your phone
Now connect your Android device to your computer. Enter the following commands to gain write access to the system partition on your phone. Your phone might ask you to confirm giving super user access to ADB (or the terminal). You should allow these requests.
adb shell
su
mount -o remount,rw /system
The output should look somewhat like this:
jeroen@pc ~/Downloads $ adb shell
* daemon not running. starting it now on port 5037 *
* daemon started successfully *
shell@bacon:/ $ su
root@bacon:/ # remount -o remount,rw /system
root@bacon:/ #
If you get any errors, check if your device has proper root access and try again.
Now that the phone is ready, let's put the files in the right place. Execute the following commands (edit them to make the certificate path and filename fit)
mv /sdcard/Downloads/69241f1f.0 /system/etc/security/cacerts
chmod 644 /system/etc/security/cacerts/69241f1f.0
This will move the file to the system certificate store and give it the proper permissions.
Cleaning up and confirming the installation
If all commands executed without any problems, it's time to clean up. Execute the following command to make the system partition read-only again.
mount -o remount,ro /system
Now reboot your device to make sure the new certificate has been loaded.
Now it's time to check if the installation works correctly. Open your device settings and navigate to Security > Trusted Credentials. Look through the list to see if you can see your certificate:
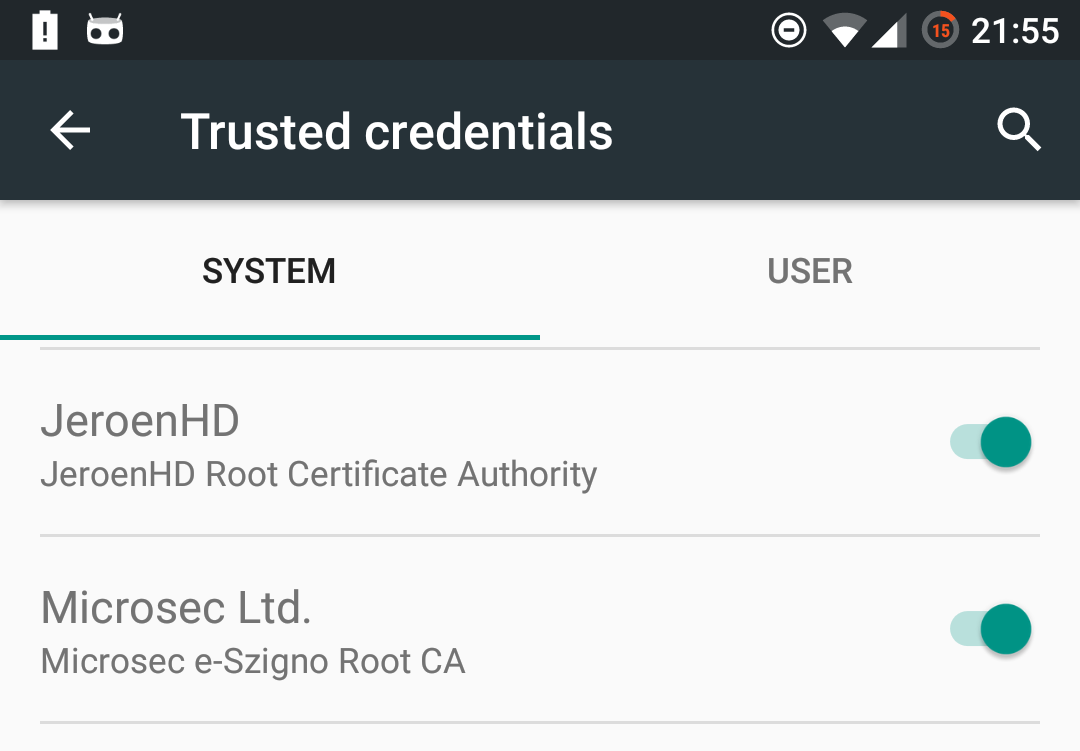
Your web interception proxies and intranet sites should now load without any issues! Even better, by installing the certificate as a system certificate you no longer need to set a lock screen to make the certificate work!
Written by Jeroen on August 24, 2016